


Tuesday, April 14, 2009
Structural Walkthrough
Dave Mack giving tour of building. Thank you Historical Society of Old Newbury for the opportunity to work on such an important piece of history.
Concrete footings
Mobil mix concrete. It is mixed right off the back of the truck

4x4 footing with rebar. Notice the buried bricks underneath the existing concrete pad.

Saturday, March 28, 2009
3rd floor Girt
We are going to rebuild and insert a 9" T beam down the center of the girter.  after steel is placed and throughbolted, we can scarf old timbers onto girter, concealing the steel.

Girter will now be structurally sound. We will also fill any gaps and voids with Abatron epoxy.

 after steel is placed and throughbolted, we can scarf old timbers onto girter, concealing the steel.
Girter will now be structurally sound. We will also fill any gaps and voids with Abatron epoxy.

Structure
New 3rd floor joist and subfloor. New joist were milled to match existing ones. Providing a perfect fit into old mortices and brick pockets.

2nd floor Beam. 4 16" LVL's thoughbolted. It replaces old Steel beam that caused considerable damage to brickwork.

Floor repairs
2nd floor patching. We replaced the flooring in kind (thickness, width, and species) The floor has 2 layers measuring 2 1/2" thick!

3rd floor needs extensive repairs. 

New Stair
Top of 2nd floor stair, with temporary railing

We used a 200 year old hand hewn stair stringer to cover the LVL stringers. The treads and risers will be finished with older wood.

New stairwell opening to 2nd floor

Thursday, March 19, 2009
Steel Removal
Existing 6x18 Steel beam to be cut and removed. The brick around the web was carefully removed and saved for re-use Newburyport Fire Department on call for torch cutting.

 Newburyport Fire Department on call for torch cutting.
Dave Mack (center) from The Historical Society of Old Newbury on hand to make sure all precautions were taken.

Torch Cut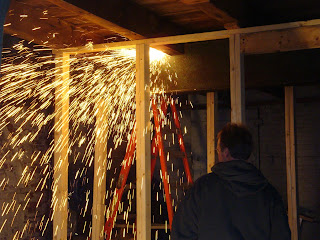

Start of Phase II
3rd Floor steps. They were sagging 2" out of level. We have now lifted and re-secured them.

3 floors down....................
Girder beam damage done by leaking roof hatch. We are going to insert more flat plate steel and rebuild beam


Girder beam damage done by leaking roof hatch. We are going to insert more flat plate steel and rebuild beam

Saturday, March 14, 2009
Phase one complete
New mahogany, copper and rubber roofing. The roof system is now structurally sound and safe from the elements. View from The Cushing House Museum

 View from The Cushing House Museum
Rubber roof
Southwest corner

The rubber roofing has seams only at the hips. 

The roof deck and rubber membrane has an adhesive applied to both surfaces for bonding. 

Tuesday, March 10, 2009
Rigid Foam and Plywood
The styrofoam gets a 1/2" smooth plywood top for the rubber roofing. Copper detail

 Copper detail
2x6 solid edge for copper drip edge
Roofing delivery 1 1/2" styrofoam with an R value of 7.5 and a roll of 20x100 50 year rubber roofing. With larger roll the rubber will have no seams on roof.


Roofing delivery 1 1/2" styrofoam with an R value of 7.5 and a roll of 20x100 50 year rubber roofing. With larger roll the rubber will have no seams on roof.

Steel plates/ Roof Beam
The wood and steel is throughbolted with 1/2" x 12" carraige bolts. 

Main girder is notched to accept steel.

1/2" steel to re-inforce main girder of Roof

Wednesday, March 4, 2009


Main tie beam and plate
We were able to salvage the solid part of old hip rafter for replacement of end plate. Now we have a solid surface for the trim.

We are also having a 1/2" flat steel plate made to tie beam into wall.

Completely deteriorated.

As we work our way around the perimeter we have found more decay. Birds nested at plate and beam intersection. The worst of all places.

Tuesday, March 3, 2009
Oil base primer
touching up the primer, ready to add copper drip edge flashing

All holes were filled with an epoxy and sanded smooth. 

Exterior trim Detail
New roof edge

All end cuts are sealed with primer
.....and fastened with stainless finish screws


.....and fastened with stainless finish screws

Substrate
Felt paper was applied for moisture control

The substrate which was rotted was strategically carved out and replaced with solid material


The substrate which was rotted was strategically carved out and replaced with solid material

Saturday, February 28, 2009
Exterior trim Detail
New Mahogany roof eave trim. It will be capped with copper flashing Mock-up

 Cutting the sheathing overhang to match up with 6" Mahogany crown Moulding
 Mock-up
 Cutting the sheathing overhang to match up with 6" Mahogany crown Moulding
Subscribe to:
Posts (Atom)


